Module Manager - Developer Guide
By: CS2113-T15-3 Since: 2020
Table of Contents
- Introduction
1.1 Purpose
1.2 Scope - Setting up
2.1 Prerequisites
2.2 Setting up the project in your computer
2.3 Verifying the setup
2.4 Configurations to do before writing code - Design
3.1 Architecture
3.2 UI component
3.3 Logic component
3.4 Model component
3.5 Storage component - Implementation
4.1 Addition
. . 4.1.1 Add to Semester feature
. . 4.1.2 Add to available feature
. . 4.1.3 Design Considerations
4.2 Deletion
. . 4.2.1 Delete from Semester feature
. . 4.2.2 Delete from Available feature
4.3 Others
. . 4.3.1 Calculate CAP feature
. . 4.3.2 Marking module as done
. . 4.3.3 Searching modules with keywords
. . 4.3.4 Viewing modules - Documentation
5.1 Written documentation
5.2 Diagrams - General Design Considerations
Appendix A: Product Scope
Appendix B: User Stories
Appendix C: Glossary
Appendix D: Instructions for Manual Testing
Appendix E: Non-Functional Requirements
1. Introduction
1.1 Purpose
The document contains the specified architecture and software design specifications for the application, Module Manager.
1.2 Scope
This describes the software architecture and software design requirements for Module Manager. This guide is mainly for developers, designers and software engineers that are or going to work on Module Manager.
2. Setting up
2.1 Prerequisites
- JDK
11. - IntelliJ IDE.
2.2 Setting up the project in your computer
- Fork this repository, and clone the fork repository to your computer
- Open Intellij (if you are not in the welcome screen, click
File>Close Projectto close the existing project dialog first) - Set up the correct JDK version for Gradle
- Click
Configure>Structure for New Projectsand thenProject Settings>Project>Project SDK - If
JDK 11is listed in the drop down, select it. Otherwise, clickNew…and select the directory where you installedJDK 11 - Click
OK
- Click
- Click
Import Project - Locate the
build.gradlefile and select it. ClickOK - Click
Open as Project - Click
OKto accept the default settings if prompted
2.3 Verifying the setup
- Run Module Manager to verify and try a few commands. Do refer to the user guide for a list of commands to try out.
- Run the JUnit Tests/gradlew test command to ensure that all test case passes.
2.4 Configurations to do before writing code
Configuring the coding style
- Module Manager uses CheckStyle to check for code quality violations.
- To configure your project to use CheckStyle, add
id 'checkstyle'under plugins for yourbuild.gradlefile. - Ensure that your CheckStyle toolVersion is 8.23 by adding
toolVersion = '8.23'into yourbuild.gradlefile. Refer to Module Manager’sbuild.gradlewfile as a reference to set up CheckStyle correctly.
Getting started with coding When you are ready to start coding, we recommend that you get a sense of the overall design by reading about Module Manager’s architecture in the next section.
3. Design
This section provides a high level overview of our application, Module Manager.
Design & Implementation
3.1 Architecture

The Architecture Diagram given above explains the high-level design of the Module Manager Application.
Module Manager consists of a main class called Duke responsible for
- At app launch: Initializes the components in the correct sequence, and connects them up with each other
- At shut down: Shuts down the components and invokes cleanup method where necessary
The other components involved are:
UI: The user interface of the application
Parser: This class mainly handles the parsing and handling of user commands
Command: This class handles the type of command
Person: This class manages the data of the user in memory
Controller: This class determines what to do with the parsed input of the user
Storage: Reads data from, and writes data to, the hard disk
3.2 UI component
Given below is the structure of the Ui component:

The UI component consists of a Ui class that stores all user interaction output data.
It displays all user interactions to the user based on the command line inputs received.
The UI component,
- Executes user commands using the
Logiccomponent
3.3 Logic component
Given below is the object diagram of the Logic Component

The Logic component
Logicuses theParserclass to parse the user command.- The parsed command is passed to
Controllerwhich then returns a specific command class e.g.AddCommand,FindCommandetc. which is executed by the main classDuke. All these command classes inherits from the abstractCommandclass. - The command execution can affect the Model (e.g. adding a module in ModuleList)
- The result of the command execution is passed back to the Ui.
- In addition, the command execution can also instruct the
Uito perform certain actions, such as displaying help to the user.
3.4 Model component
Given below is the class diagram of the Model Component:
.png)
The Model component is responsible for serving as a boundary between the Controller component and Storage
component.
The responsibilities of the Model component includes
- Storing the data in-memory during programme runtime. It stores all
SelectedModuleobjects in anArrayList<SelectedModule>in aSemModulesListclass. This represents a semester of the user’s module plan. - All
ArrayList<SelectedModule>is then stored in aPriorityQueue<SemModulesList>which containsSemModulesListin an ordered fashion. This class is calledSemesterList, which represents the entire module plan of the user.
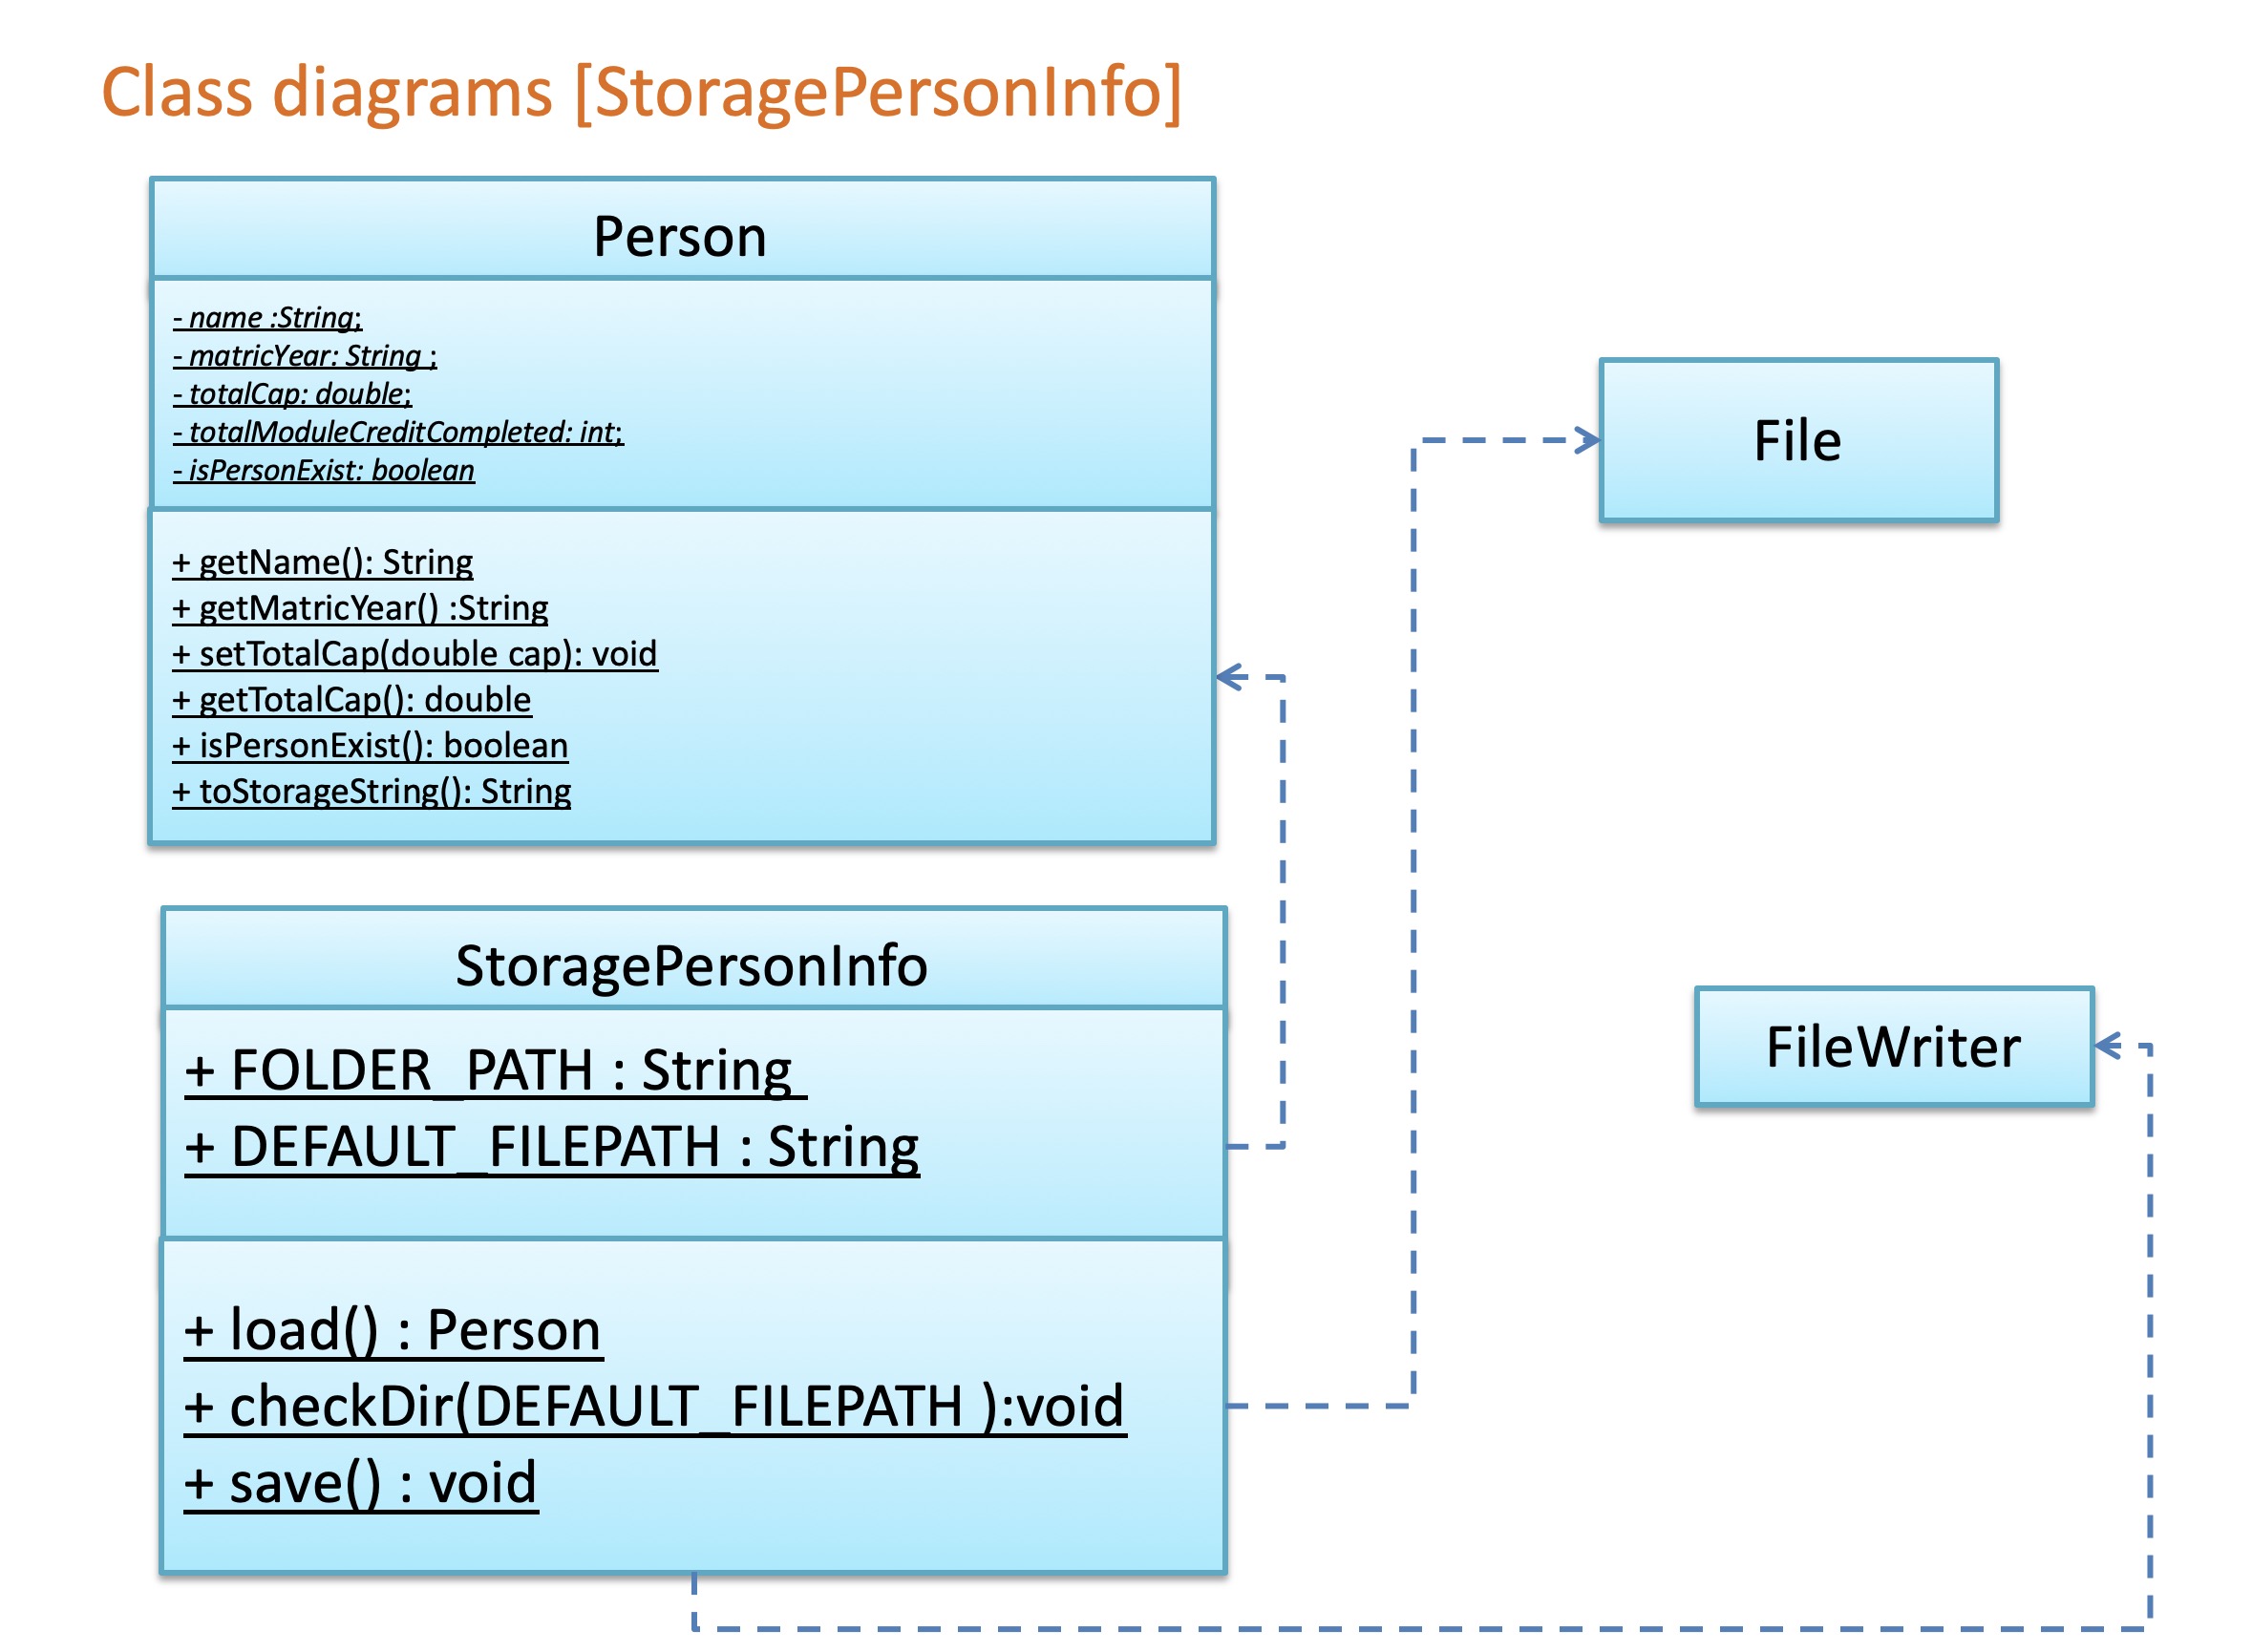
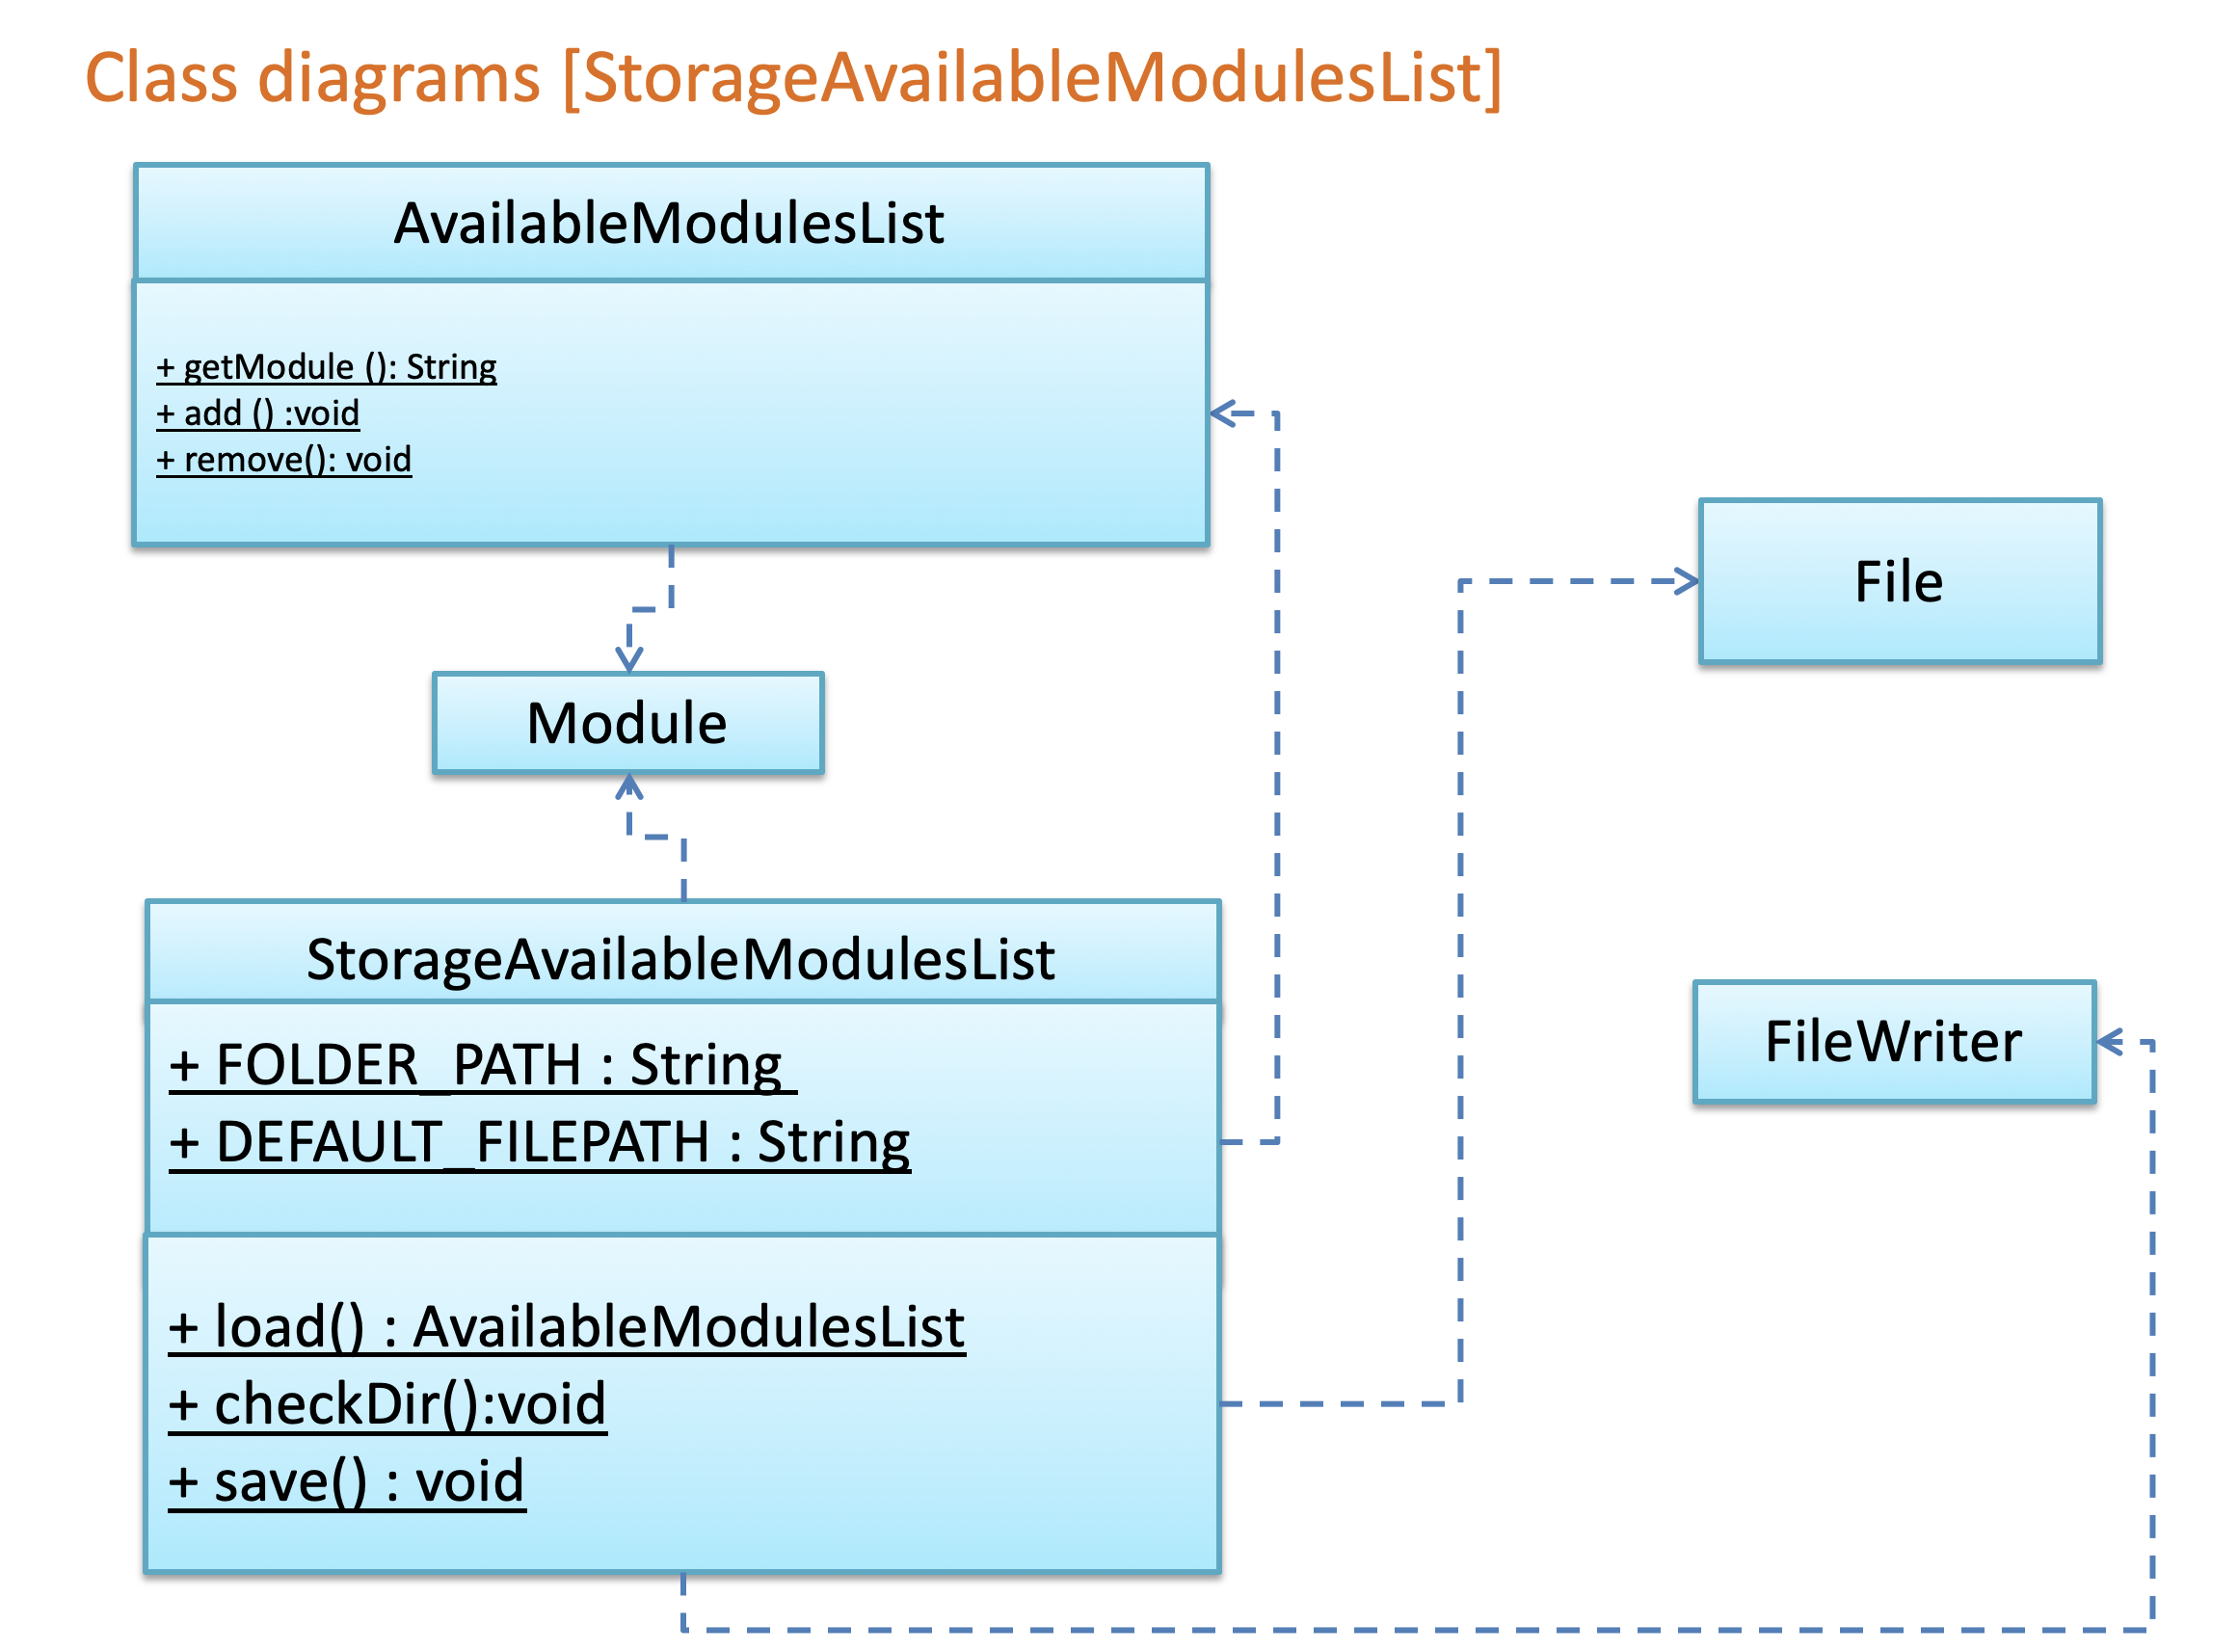
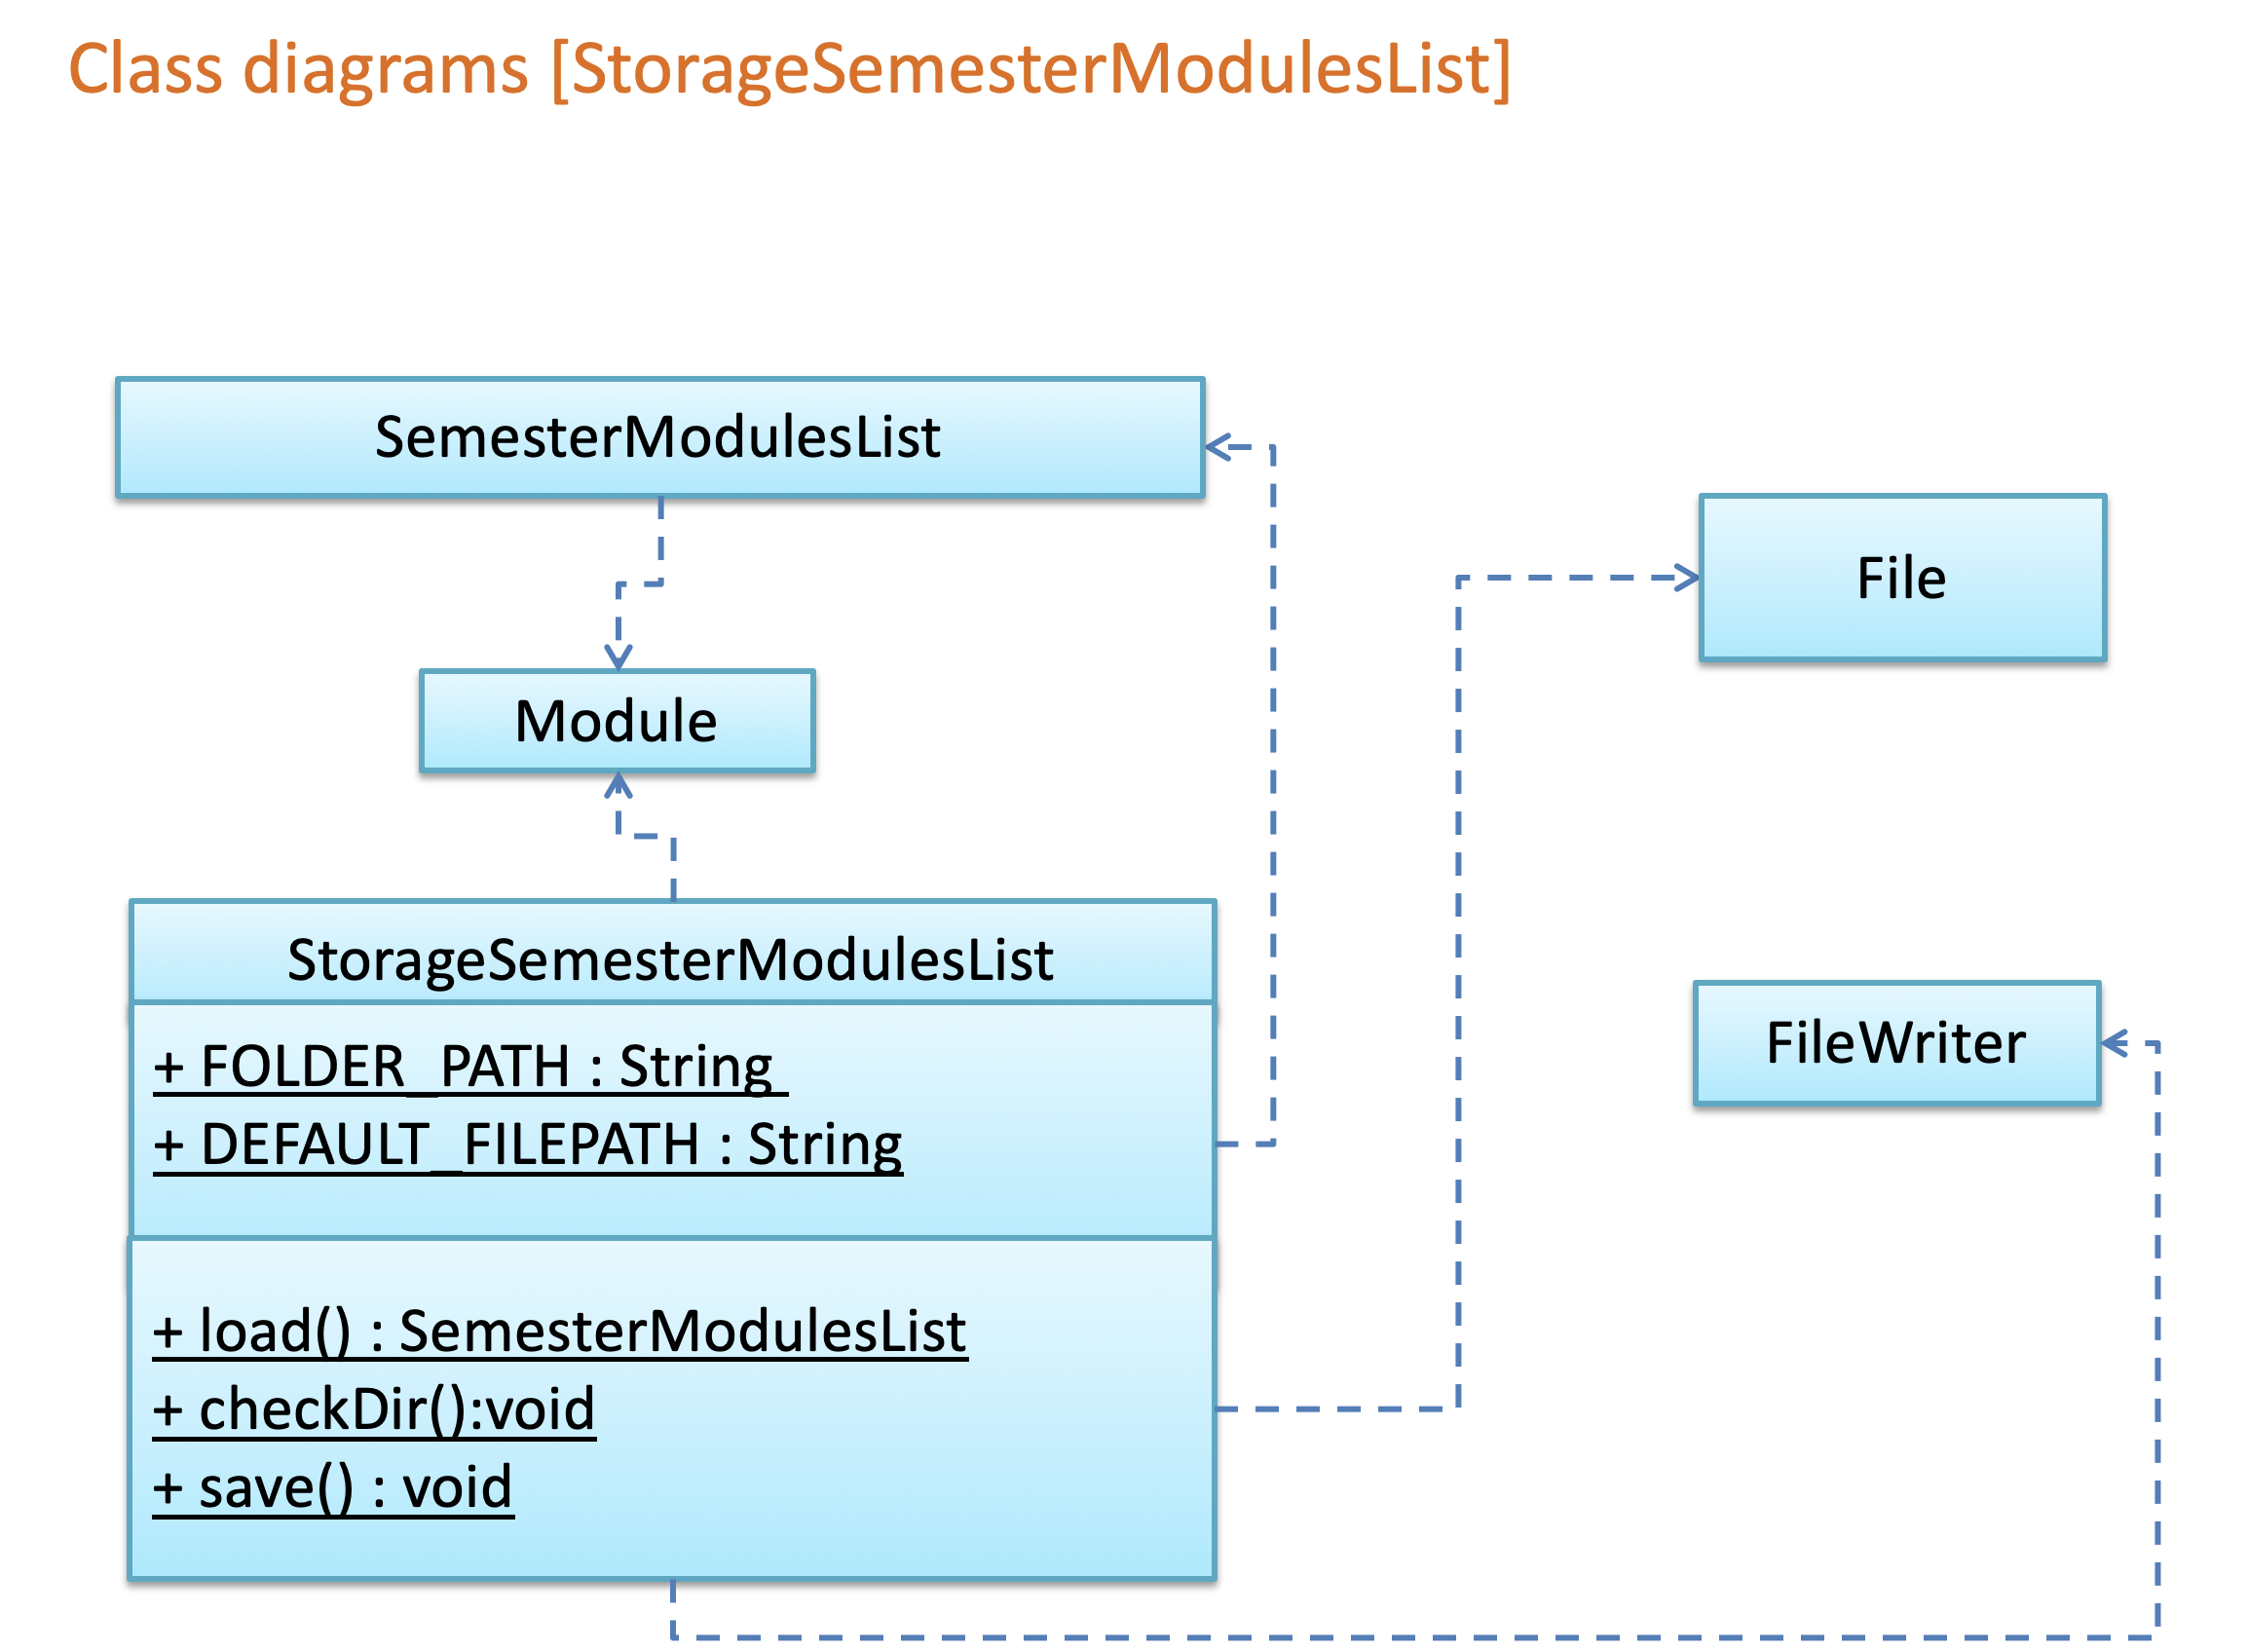
3.5 Storage component
The Storage component,
- can save
personInfoobjects in csv format and read it back - can save the available module list in csv format and read it back
- can save the semester list in csv format and read it back
Given below are Class Diagram of StoragePersonInfo, StorageAvailableModulesList and StorageSemesterList
4. Implementation
This section describes some details on how the features are being implemented. All features can be broken down into 4 distinct functionalities - addition, deletion, searching and others.
Definition:
SemModuleList - An array list of Module objects, used to contain modules allocated to a specific semester.
Signifies a semester in the user’s module plan.
SemesterList - A priority queue of SemModuleList, used to contain semModuleList in an sorted order.
Signifies all semesters of the user’s module plan.
4.1 Addition
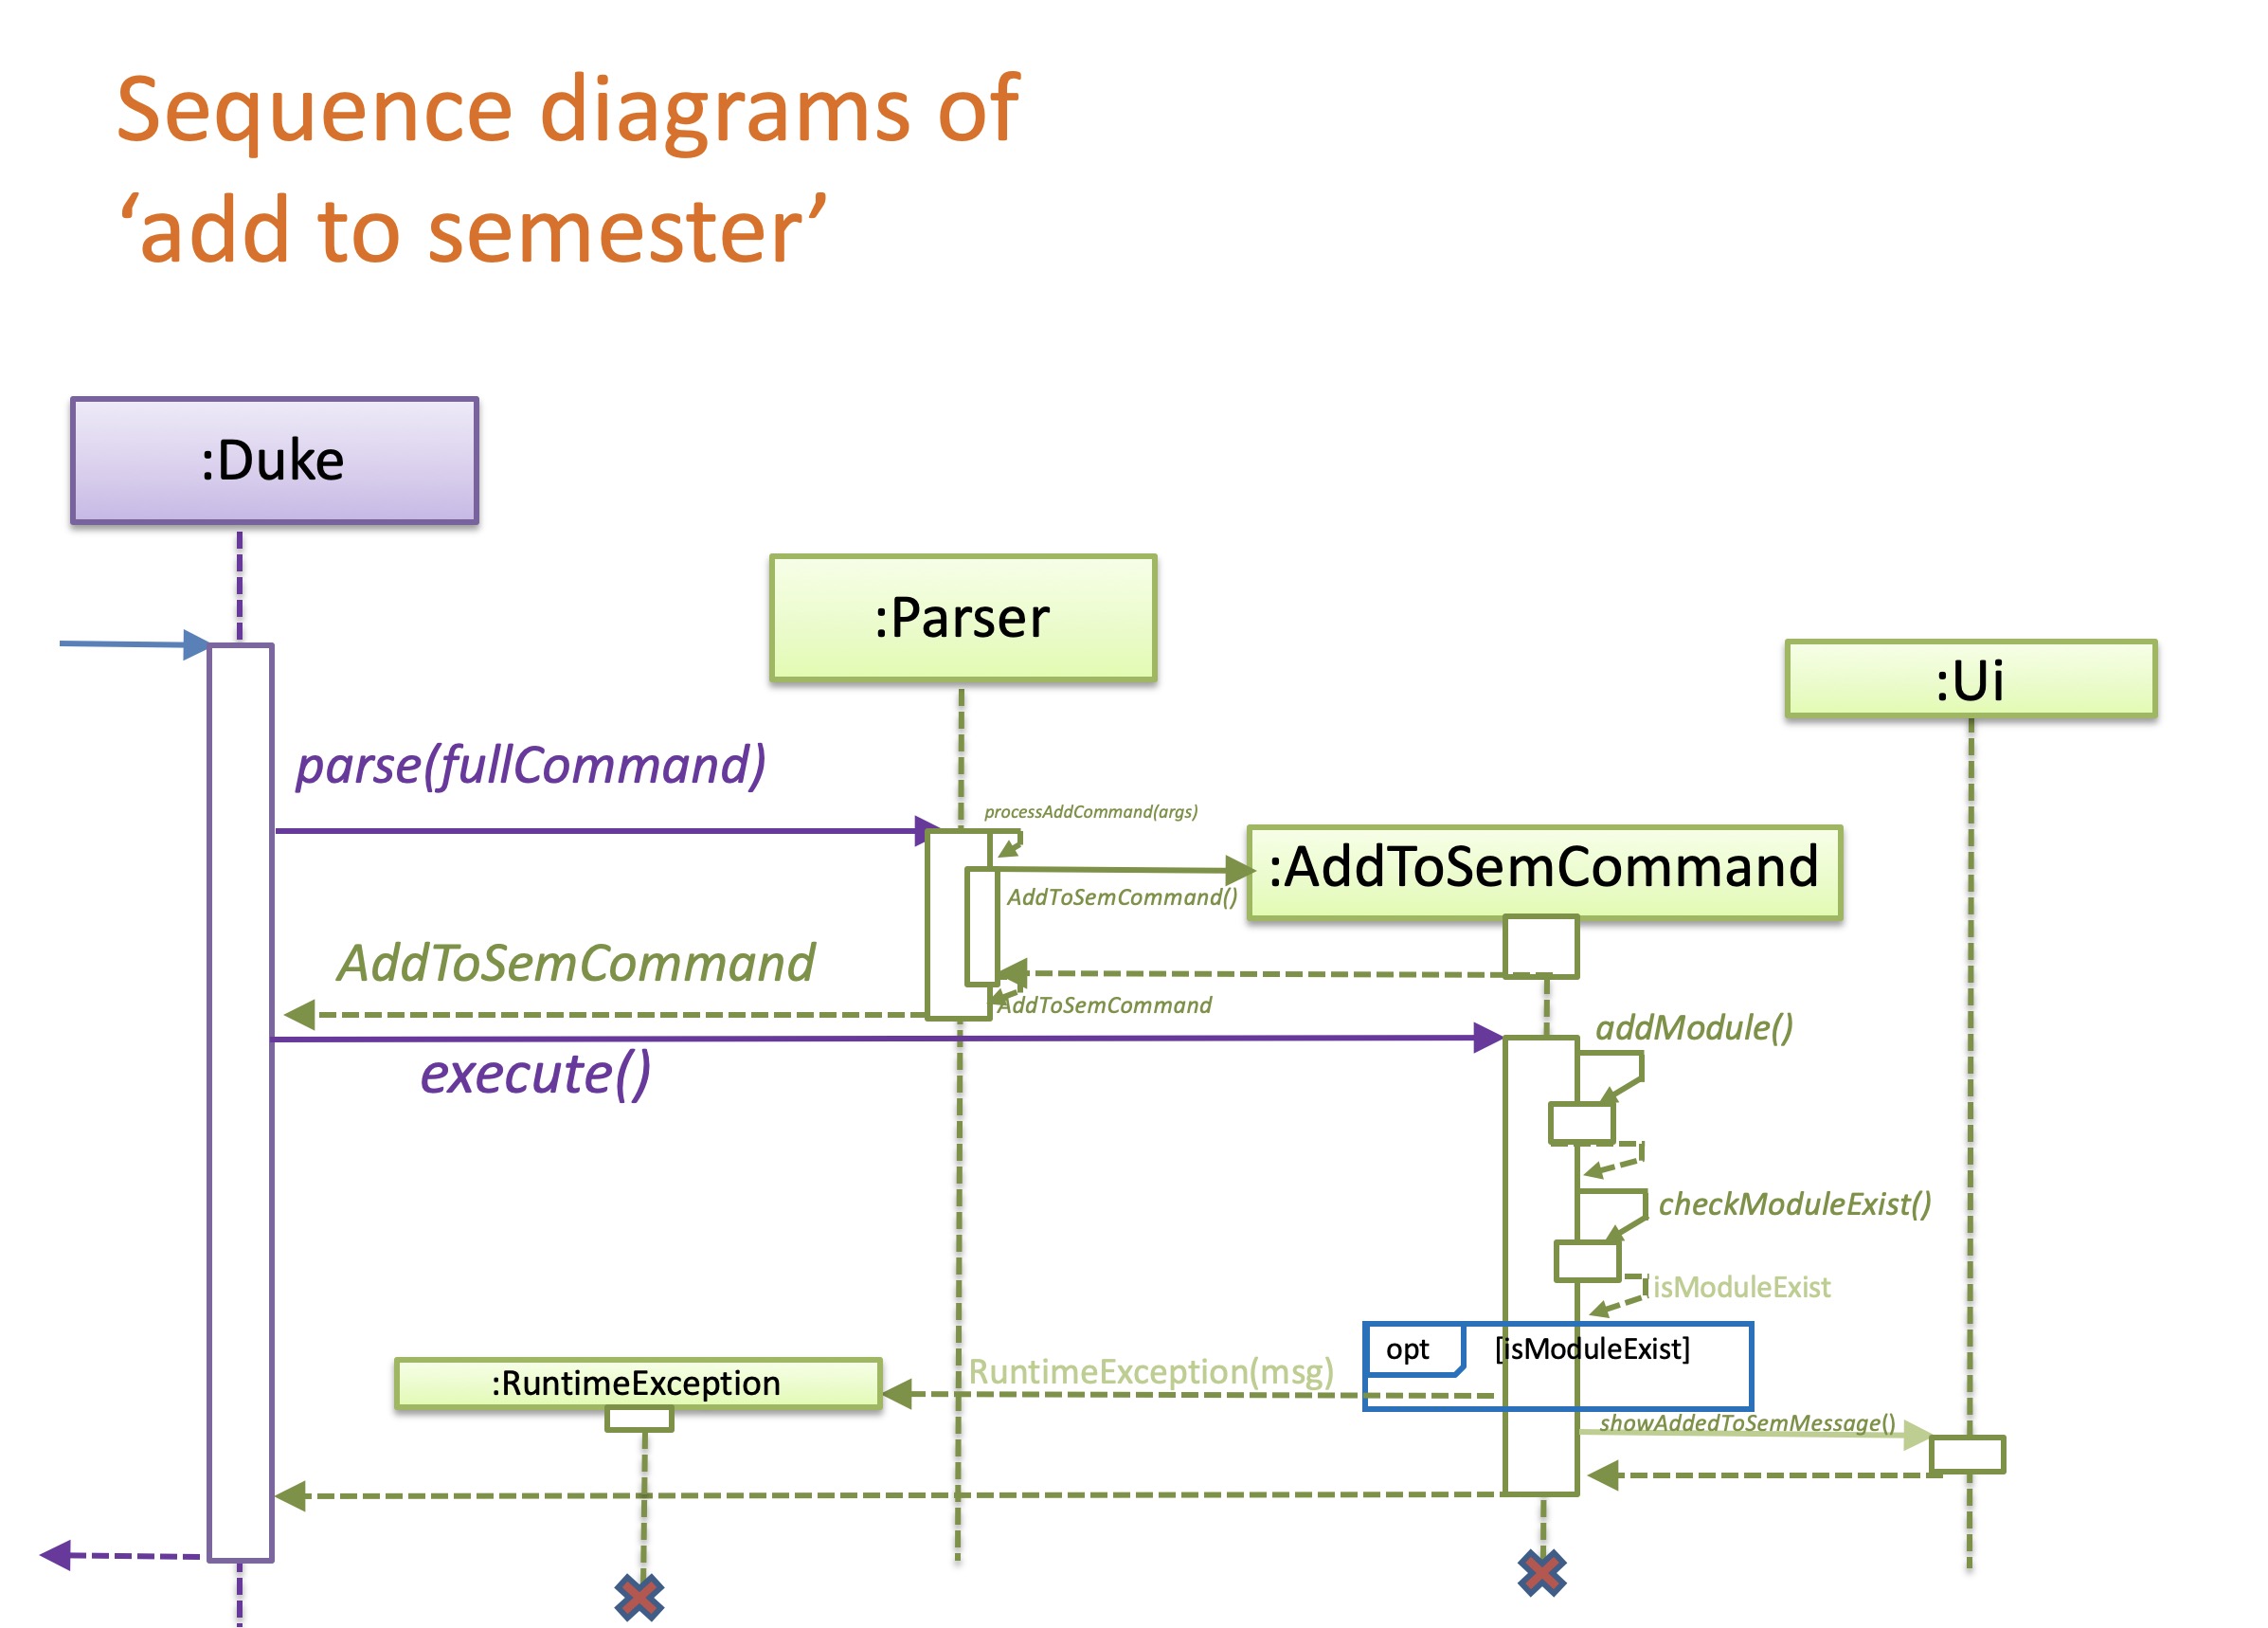
4.1.1 Add to Semester feature
The Add to Semester mechanism is facilitated by AddtoSemCommand which extends from an abstract class Command.
It allows ModuleManager to assign a module to a semester by adding the module to a
SemModulesList.
This feature implements the following operations:
Given below is an example how the Add to Semester behaves at each step.
Step 1:
The user launches the application for the first time. The SemesterList will initialize an empty
SemModulesList.
Step 2:
When users enter an add to semester command, e.g add id/CS2113 s/4 mc/4, the command will be parsed in Parser
which will return an AddToSemCommand. AddToSemCommand then calls Command#execute(SemesterList semesterList,
AvailableModulesList availableModulesList) , in this context,
(AddToSemCommand#execute(SemesterList semesterList, AvailableModulesList availableModulesList))
Step 3:
AddToSemCommand#execute() then calls self method AddToSemCommand#addModule() which calls
AddToSemCommand#checkModuleExist(semesterList) to check whether the selected module is already in the
user’s module plan (i.e:semesterList).
If the module is not in the list, AddToSemCommand#addModule() will check whether there is a semester list
(i.e:semesterModulesList) whose name is equal to the module’s semester name.
If the semester list exists, the module will be added to the list.
If not, AddToSemCommand#addModule() will create a new semester list and then add this module to the new list.
Finally, this new semester list will be added to semesterList.
Step 4:
AddToSemCommand#execute() calls Ui.showAddedToSemMessage(selectedModule.announceAdded()) to tell the user that the
command has been executed.
The following sequence diagram shows how the Add to Semester operation works:
4.1.2 Add to available feature
The Add to available mechanism is facilitated by AddtoAvailableCommand which extends from an abstract class
Command.
It allows ModuleManager to add a module to the AvailableModulesList so that users may access its data or add it
to their module plan in the future.
This feature implements the following operations:
Given below is an example how the Add to available behaves at each step.
Step 1:
When users enter an add to available command,
e.g add id/CS1231 n/Discrete Structures mc/4 pre/, the command will be parsed in Parser
which will return its parsed Strings to Controller. Controller takes in the Strings from Parser and creates
a AddToAvailableCommand object, which then calls Command#execute(SemesterList semesterList,
AvailableModulesList availableModulesList) , in this context,
(AddToAvailableCommand#execute(SemesterList semesterList, AvailableModulesList availableModulesList))
Step 2:
AddToAvailableCommand#execute() then calls self method AddToAvailableCommand#addModule() which iterates through
the availableModulesList to check if there exists a module which has the same name, same id, or both.
If there is already a module with the same name and id, the program throws a RuntimeException to tell the user
that the module is already in the list.
If only the name attribute of the module exists, the id attribute will be updated, and vice versa.
If there is no module that shares the name and id of the newly added module, the newModule object will be passed
into AvailableModulesList#add() method to add it into the availableModulesList.
Step 3:
Finally, the AddToAvailableCommand#checkSemesterList() method is called to check if the newModule object is also
in the semesterList. If it exists, both its name and id attributes are updated.
4.1.3 Design considerations
Aspect: What is the format of add command
Alternative 1 (current choice): Both Add to Semester and Add to Available use add command word.
| Pros | Can input command faster. |
| Cons | May not distinguish these two types of command. |
Alternative 2: Add to Semester uses addtosem while Add to Available uses addtodata
| Pros | Easy to distinguish these two types of command. |
| Cons | Will lower the typing speed. |
4.2 Deletion
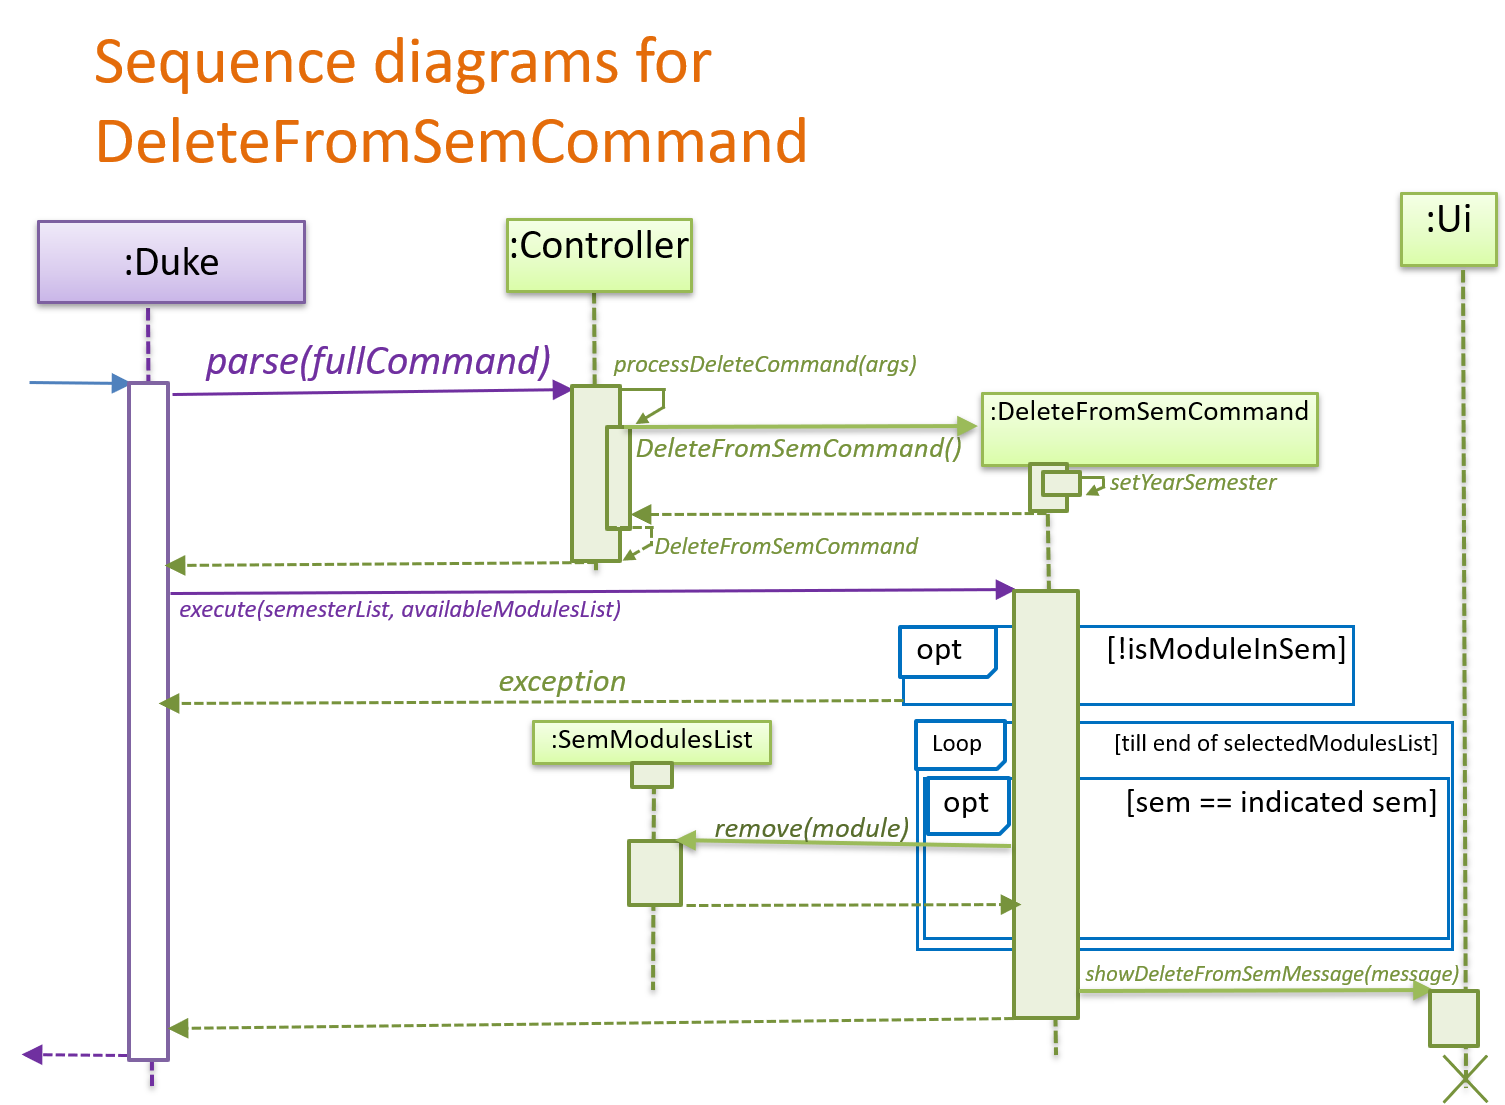
4.2.1 Delete from Semester feature
The Delete from Semester mechanism is facilitated by DeleteFromSemCommand, which extends from DeleteCommand.
Whereas DeleteCommand extends from the abstract class Commmand.
It allows ModuleManager to delete a module from a SemModulesList.
By doing so, the following operations are carried out:
Step 1:
When a user enters a delete from semester command, e.g delete id/IS4241 s/4, this command is being parsed in Controller.
Controller then returns a DeleteFromSemCommand, which calls
Command.execute(SemesterList semesterList, AvailableModulesList availableModulesList), in this context,
DeleteFromSemCommand#execute(SemesterList semesterList, AvailableModulesList availableModulesList).
Step 2:
DeleteFromSemCommand.execute then calls its own method checkModuleExistInCorrectSem(selectedModulesList).
checkModuleExistInCorrectSem(selectedModulesList) returns a boolean value regarding whether there is such
a module in the semester stated by the user.
If the module does not exist in that semester, a RuntimeException is thrown.
Otherwise, it will run through the semModulesList in the selectedModulesList to find the semester indicated.
It then calls a method of SemModulesList, getModule(moduleIdentifier), which returns the corresponding module,
based on either the moduleId or moduleName.
Following, it then calls another method of SemModulesList, remove(module), which removes the corresponding module.
Step 3:
DeleteFromSemCommand.execute finally calls Ui.showDeleteFromSemMessage(String.format(
"Module %s has been deleted from semester %s", moduleIdentifier, yearSemester));
This tells the user the module that has been deleted from the corresponding semester.
The sequence diagram below shows the mechanics of DeleteFromSemCommand:
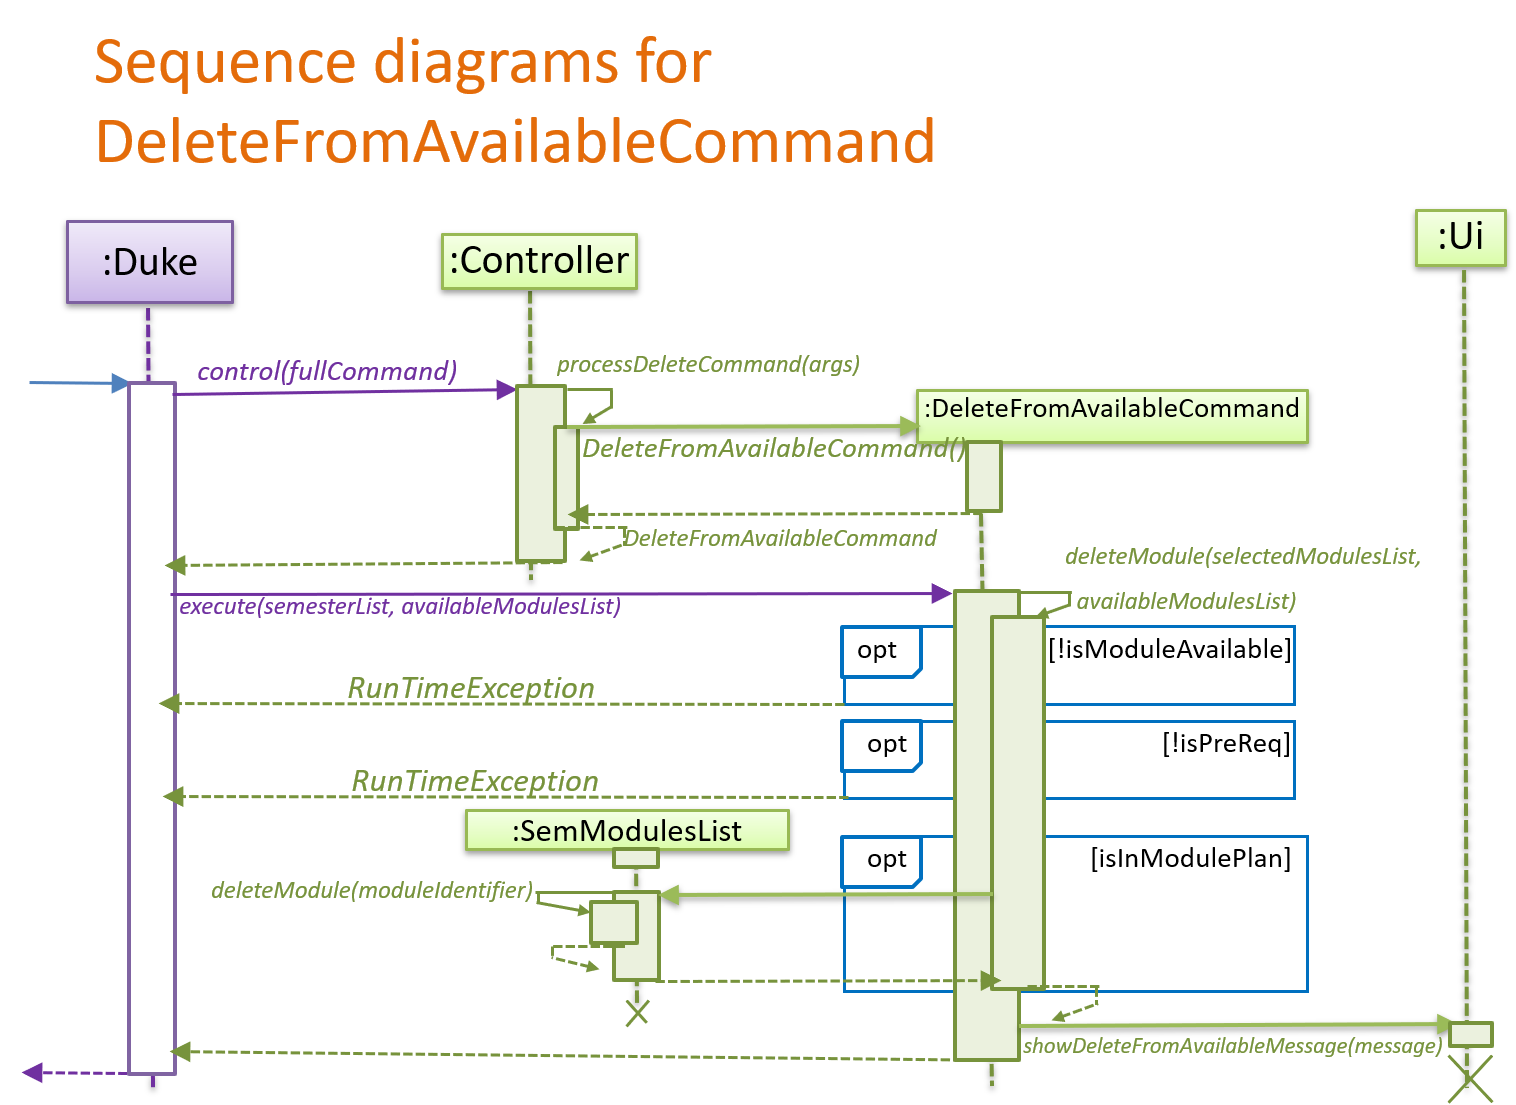
4.2.2 Delete from Available feature
The Delete from Available mechanism is facilitated by DeleteFromAvailableCommand,
which extends from DeleteCommand. Whereas DeleteCommand extends from the abstract class Commmand.
It allows ModuleManager to delete a module from a AvailableModulesList.
By doing so, the following operations are carried out:
Step 1:
When a user first inputs a delete command, eg. delete id/CS1010, this command is being parsed in Controller.
Controller then returns a DeleteFromAvailableCommand, which follows to call
Command.execute(SemesterList semesterList, AvailableModulesList availableModulesList), in this context,
DeleteFromAvailableCommand#execute(SemesterList semesterList, AvailableModulesList availableModulesList).
Step 2:
DeleteFromAvailableCommand then proceeds to call its own method deleteModule(SemesterList selectedModulesList,
AvailableModulesList availableModulesList).
In this method, it first calls another method checkIfModuleAvailable(AvailableModulesList availableModulesList),
which returns a boolean value about whether the module inputted is in the list of available modules to choose from.
If the module is not found in the list of the available modules, it proceeds to throw a RunTimeException.
Step 3:
Or else, another method in DeleleFromAvailableCommand,
checkIfIsPreReq(Module moduleToCheck, AvailableModulesList availableModulesList) is called.
If the module selected is a prerequisite to other modules, it will throw a RuntimeException.
Step 4:
Or else, DeleteFromAvailableCommand then proceeds to call the method Ui.showDeleteFromAvailableMessage(String module).
This tells the user that the module has been deleted from the list of available modules.
Step 5:
It will call another method checkIfInModulePlan(String moduleId, SemesterList selectedModulesList)
This checks if the module is in the user’s module plan.
If the module is in the user’s module plan, the module will be deleted from the module plan.
DeleteFromAvailableCommand will then proceed to call the
Ui.showDeleteFromAvailableFollowUpMessage(String module) method.
This show the user that on top of deleting the module from the list of available modules,
it has also been deleted from the user’s module plan.
The sequence diagram below shows the mechanics of DeleteFromAvailableCommand:
4.3 Others
4.3.1 Calculate CAP feature
The Calculate CAP mechanism is executed by CalculateCapCommand.
CalculateCapCommand is extended from Command and this implementation calculates the CAP using completed
SelectedModule stored in SemModulesList.
Given below is the behaviour of the Calculate CAP mechanism at each step:
Step 1:
User launches the application. SelectedModules are added to SemModuleList through either of the following methods:
1) Imported from semesterList.csv using StorageSemesterList.load()
2) Added using add id/ID s/SEMESTER mc/MODULE_CREDIT command
Step 2:
User executes CAP command to view his own CAP. The CAP commands is parsed through Parser, which would then return
CalculateCapCommand(). CalculateCapCommand.execute() is then called.
Step 3:
CalculateCapCommand.execute() will call CalculateCapCommand.calculateCap(SemesterList semesterList), which will
calculate CAP by looking for all the completed SelectedModules stored within SemModuleList, which are stored within
SemesterList. It will then assign a double type ranging from 0.00 to 5.00 to Person.totalCap.
Step 4:
After the CAP is assigned to Person.totalCap, Person.totalCap is then called and formatted using DecimalFormat
into a String
with a pattern of #.00. Ui.showcap(cap) is called to display the user’s cap using the formatted String.
The following diagram shows how the Calculate CAP operation works:

4.3.2 Marking module as done
The Marking as done mechanism is executed by MarkAsDoneCommand.
MarkAsDoneCommand is extended from the abstract class Command, and this implementation marks the module that has
been added to a SemModuleList in the SemesterList as done, and updates the respective grade to the Module object.
Given below is the behaviour of the Marking module as done mechanism at each step:
Step 1:
User launches the application. SelectedModules are added to SemModuleList through either of the following methods:
1) Imported from semesterList.csv using StorageSemesterList.load()
2) Added using add id/ID s/SEMESTER mc/MODULE_CREDIT command
Step 2:
User enters a mark as done command e.g. done id/CS2113 g/A+ . The command will be parsed in Parser,
which will return its parsed Strings to Controller. Controller takes in the Strings from Parser and creates
a MarkAsDoneCommand object which then calls
Command.execute(SemesterList semesterList, AvailableModulesList availableModulesList), in this context,
(MarkAsDoneCommand#execute(SemesterList semesterList, AvailableModulesList availableModulesList)).
Step 3:
MarkAsDoneCommand#execute() then calls self method MarkAsDone#markAsDone() which iterates through the
semesterList to check all SemModulesList and compare module name or id to see if the module that is being
marked as done exists in the semesterList.
If the module exists in the list, the method will proceed to step 4. If the module does not exist in the list,
a RuntimeExcption will be thrown to tell the user that the module does not exist in the user’s module plan.
Step 4:
Once corresponding module is found, the method will check the grade being assigned to module as well as whether
the module has already been marked as done.
If the module is being assigned a passing grade and has not been marked done,
personPerson.addTotalModuleCreditCompleted() is called to add the number of module credit of the module to the user’s
totalModuleCreditCompleted attribute.
If the module is being assigned a failing grade but has already been marked as done,
personPerson.minusTotalModuleCreditCompleted() is called to reduce the number of module credit of the module
from the user’s totalModuleCreditCompleted attribute. This conditional step is for the case when user wants to change
the grade of a module from a passing grade to failing grade.
Step 5:
The grade of the module will be passed to the Module object to update the grade attribute,
and the isDone attribute of the module will be updated to be true.
Step 6:
If the grade being assigned is a failing grade, self method will be appendFailString called. appendFailString will
construct a new StringBuilder and check if the module has an id attribute by calling module.isIdValid() method.
If the method has an id, the module’s id will be appended to the StringBuilder. If the module does not have an id
attribute, the method will check if the module has a name attribute by calling module.isNameValid() method. The
module’s name will then be appended to the StringBuilder. After appending the module’s id or name, " Failed" string
will be appended to the StringBuilder.
Step 7:
A new SelectedModule will be constructed using the String derived from StringBuilder.toString(), the Semester of
the module called from the module’s getSem() method and the number of module credits called from the module’s
getModuleCredit() method.
Once the new SelectedModule has been constructed, the module that is being assigned a failing grade will be removed
from the SemModuleList.
Step 8:
The new SelectedModule will be updated by updating its isDone attribute to true and updated with the grade that
was supposed to be assigned using the SetAsDone. It will then be added to the same SemModuleList as the removed
module.
The sequence diagram below shows the mechanics of MarkAsDoneCommand:

Design Consider:
- Alternative 1 (current choice): Marked the module with a failing grade without
appendFailStringmethod.
| Pros | Shows the failed module details clearly |
| Cons | User has to manually add a module using another Id or Name when adding the same module as the failed module. |
| A module will also be added into AvailableModuleList when user manually adds a module |
- Alternative 2 (current choice): Delete the original module marked being assigned a failing grade and add a placeholder
SelectedModuleassigned with same failing grade.
| Pros | Allows user to add using the original name/id as the module that has been failed |
| Cons | User may not know the name of the placeholder module and do not know how to delete it |
4.3.3 Searching modules with keywords
The FindCommand allows users to look up commands using keywords. It then displays a list of related modules in
the module plan and the list of available modules.
Step 1:
When a user enters the find keyword, the command is being parsed in Controller.
Controller then returns a FindCommand, which proceeds to call
Command.execute(SemesterList semesterList, AvailableModulesList availableModulesList), or in this context,
FindCommand.execute(SemesterList semesterList, AvailableModulesList availableModulesList).
Step 2:
In the execute(SemesterList semesterList, AvailableModulesList availableModulesList) method, it first calls another
method in the FindCommand class,
generateResult(SemesterList selectedModulesList, AvailableModulesList availableModulesList). Within this method, it
first runs through the module plan to look for modules that contain the corresponding keyword.
After this is done, it searches the list of available modules for any relevant modules.
The list of relevant modules from the module plan and the list of available modules is then converted into a String
object and passed back to the execute(semesterList, availableModulesList) method.
Step 3:
Finally, with the String of the list of relevant modules, the Ui.showFindMessage(result) is called, and the list of
relevant modules from the both the module plan and the list of available modules is printed out.
The sequence diagram below shows the mechanics of FindCommand:

4.3.4 Viewing modules
The ViewCommand allows users to see different kinds of data that has been added or updated by the user. Depending on
the subsequent string of command entered by the user, the programme will display different kinds of information to the
user.
Step 1:
When a user enters the view keyword, the command is being parsed in Controller.
Controller then returns a ViewCommand, which proceeds to call
Command.execute(SemesterList semesterList, AvailableModulesList availableModulesList), or in this context,
ViewCommand.execute(SemesterList semesterList, AvailableModulesList availableModulesList).
Step 2:
In the execute(SemesterList semesterList, AvailableModulesList availableModulesList) method, the parsed argument
is passed into a switch statement to decide the kind of data to show the user. The respective method will then be called
to print the data that the user has requested to see.
Design Considerations
- Alternative 1 (current choice): Determine user’s argument using Java contain() method
| Pro | Easy to determine the argument and match it to user’s intention |
| Cons | Easy to misunderstand what is the user’s true intention if there is mis-spelling |
- Alternative 2 : Determine user’s argument using Java equal() method
| Pro | Accurate in determining the user’s intentions based on the argument received |
| Cons | Requires users to enter precise keywords which could result in inconvenience |
5. Documentation
5.1 Written documentation
The user and developer guide are written and formatted using MarkDown.
5.2 Diagrams
Diagrams are drawn and edited using the tool draw.io. The tool provides support for a wide range of UML diagrams, such as class, object and sequence diagrams.
6. General Design Considerations
Option 1 (current choice): Have a static ModuleList availableModulesList in the AvailableModulesList class.
| Pros | When we want to query the list of available modules, we can check the availableModulesList directly since it is class level variable, without needing to access the specific instance of AvailableModulesList created initially. |
| Cons | However, there is a need to override the add(object) and remove(object) methods. This is because the built in add(object) and remove(object) methods do not delete the modules from the static variable availableModulesList. |
Option 2: Do not have a static variable availableModulesList in the AvailableModulesList class
| Pros | We do not need to override the add and remove methods of the AvailableModulesList class, thus we can directly use the built in methods. |
| Cons | However, when we want to access the list of available modules, that specific instance of AvailableModulesList instantiated in the beginning must be queried since there is no class level method. |
Appendix A: Product Scope
Target user profile
- A computer science undergraduate of NUS with a need to manage modules
- Prefer desktop apps over other types
- Able to type quickly
- Prefers to control apps with typing rather than a mouse
- Comfortable using Command Line Input apps
Value proposition
Manage and plan modules quickly with CLI, faster than a mouse or GUI driven app
Appendix B: User Stories
| Priority | As a … | I want to … | So that I can … |
|---|---|---|---|
| *** | User | View my study plan | Keep track of what is my study plan when I forget about it |
| *** | User | Add and assign modules to different semesters | Update my study plan |
| *** | User | Add modules to available module list | Add the module to my study plan when I plan to in the future |
| *** | User | Delete study plans in specific semesters | Update my study plan according to my new plan in mind |
| *** | New user | see usage instructions | Refer to instructions when I forgot how to use the App |
| *** | User | Mark module as done | Update my study plan according to modules that I have completed |
| ** | User | Calculate cap | Check my current cap based on modules I have completed |
| ** | User | find a module by name or module code | Locate a module and its module code without having to go through all the |
| modules |
Appendix C: Glossary
Mainstream OS - Windows, Linux, Unix, OS-X
Appendix D: Instructions for Manual Testing
The following is a summary of all the commands in Module Manager, and some examples of input. The commands are organised into sections, each relating to a particular feature. There is already some data preloaded into the ArchDuke jar file. You may follow the steps in numerical order to test all the features of ArchDuke.
Command Summary and Testing Instructions
Module Commands
- Adding Module to available module list
- Use the following commands to add a module to the available module list
add id/[module code] s/[semester] mc/[credit]
oradd n/[module name] s/[semester] mc/[credit]
oradd id/[module code] n/[module name] s/[semester] mc/[credit]
- Use the following commands to add a module to the available module list
- Adding Module to module plan
- Use this command to add a module from the available module list to your module plan
add id/[module code] s/[semester] mc/[credit]
oradd n/[module name] s/[semester] mc/[credit]
oradd id/[module code] n/[module name] s/[semester] mc/[credit]
- Use this command to add a module from the available module list to your module plan
- Deleting Module from module plan
- Use any of the following commands to delete a module from your module plan
delete id/[module code] s/[semester]
ordelete n/[module name] s/[semester]
- Use any of the following commands to delete a module from your module plan
- Deleting Module from available module list
- Use any of the following commands to delete a module from the available module list
delete id/[module code]ordelete n/[module name]
- Use any of the following commands to delete a module from the available module list
- Marking Module as done
- Use this command to mark a module that has been added to your module plan as done
done n/[module name] g/[grade]ordone id/[module code] g/[grade]
- Use this command to mark a module that has been added to your module plan as done
- View module plan
- Use this command to view your current module plan
view
- Use this command to view your current module plan
- View done modules
- Use this command to view modules that are done
view /dm
- Use this command to view modules that are done
- View CAP
- Use this command to view your current cap
CAP
- Use this command to view your current cap
- View Completed credits
- Use this command to view the number of module credits you have completed
view /cc
- Use this command to view the number of module credits you have completed
- Clear the module plan
- Use this command to clear your current module plan
clear
- Use this command to clear your current module plan
- Exit the Program
- Use this command to exit the program
bye
- Use this command to exit the program
- Display help
- Use this command to display help message
help
- Use this command to display help message
Appendix E: Non Functional Requirements
- Should work on any mainstream OS as long as it has Java
11or above installed. - Should be able to hold up to 1000 modules in the available module list without a noticeable sluggishness in performance for typical usage.
- A user with above average typing speed for regular English text (i.e. not code, not system admin commands) should be able to accomplish most of the tasks faster using commands than using the mouse.
- Should be secure, to prevent unauthorised modification
- Should be smooth and fast to view and edit